

.webp)

.svg)


Heat pump troubleshooting: 5 Smart Tips
Why Heat Pump Troubleshooting Skills Save You Time and Money
Heat pump troubleshooting begins with a basic understanding: your system transfers heat instead of creating it, making it highly efficient. An air-source heat pump can deliver 1.5 to 3 times more heat energy than the electrical energy it uses, but when problems arise, that efficiency is the first thing to go.
Quick Heat Pump Troubleshooting Checklist:
- Check thermostat settings - Ensure correct mode and temperature.
- Inspect circuit breakers - Look for tripped breakers.
- Replace air filters - Clogged filters restrict airflow.
- Clear outdoor unit - Remove debris, leaves, and ice.
- Listen for unusual noises - Grinding or squealing needs attention.
- Watch for constant running - May indicate filter or refrigerant issues.
- Notice temperature inconsistencies - Cold air in heat mode can mean defrost cycle or valve problems.
Most heat pump issues are either simple fixes you can handle (like thermostat settings and filter changes) or complex problems requiring professionals (like refrigerant leaks and electrical faults). Knowing the difference is key to saving time and money.
When your heat pump acts up, it's usually a specific signal. A grinding noise could be loose parts. Running constantly in mild weather often points to dirty filters or low refrigerant. Cold air when you need heat might be the normal defrost cycle or a stuck reversing valve.

Is Your Heat Pump Acting Up? Common Warning Signs
Is your heat pump making strange noises, or is your home not as comfortable as it should be? These are common warning signs that need attention. Learning to recognize these signals can prevent larger, more expensive problems.
Heat pump troubleshooting often starts with recognizing these early warnings. Unusual noises like grinding may indicate loose parts, while squealing often points to motor problems that need a professional.
It's also about what you feel. Inconsistent temperatures suggest your system is struggling to distribute air. Weak airflow from vents is another red flag, often caused by dirty filters or ductwork issues.
Short cycling—when your heat pump turns on and off too frequently—puts extra strain on your system. Finally, unexplained increased energy bills are a clear sign that your heat pump is working harder than it should, signaling an efficiency problem.

Heat Pump is Running Constantly
While heat pumps naturally run longer cycles than furnaces, especially in cold weather, non-stop operation during mild weather indicates a problem. When temperatures drop below 40°F, your heat pump works harder to extract heat, so extended run times can be normal.
However, if it runs constantly in mild weather, check these causes:
- Incorrect thermostat settings: The temperature may be set too high, or the fan is set to "On" instead of "Auto," which keeps the fan running continuously.
- Dirty air filters: Clogged filters force the system to work overtime to push air through your home.
- Low refrigerant: A leak can cause the system to run continuously without reaching the desired temperature.
- Improper system size: A unit that is too small for your home will struggle to keep up, running constantly.
Heat Pump is Blowing Cold Air (in Heat Mode)
Getting cold air from your vents in heat mode can be alarming, but it's sometimes normal.
The defrost cycle is a common cause. To melt ice from the outdoor unit, your heat pump temporarily reverses, which may send cool air indoors for a few minutes. This is normal operation.
Also, double-check your thermostat settings. Ensure it's in "Heat" mode with the fan on "Auto."
A refrigerant leak is a more serious issue. Without enough refrigerant, the heat transfer process is ineffective, resulting in cool air. This requires professional service.
The faulty reversing valve is another culprit. This component switches the system between heating and cooling. If it's stuck, your system might cool when you've set it to heat.
Smart thermostats can help you monitor these behaviors and catch problems early.
Heat Pump's Outdoor Unit is Frozen
Finding your outdoor unit covered in ice can be concerning. A thin layer of frost is normal, but heavy ice buildup signals a problem.

A defrost mode malfunction is a primary cause. If the system's defrost components fail, ice will accumulate without relief.
Restricted airflow from dirty filters or debris blocking the outdoor coil can cause moisture to freeze on the unit.
Low refrigerant from a leak can make the outdoor coil abnormally cold, causing ice to form even in mild weather.
Water drainage issues, such as a leaky gutter dripping onto the unit or poor drainage at the base, can also lead to excessive freezing.
If you see ice, you can pour warm (not hot) water over the coils to help it melt. Do not use sharp tools to chip away ice. If the problem persists, it's time to call a professional.
Your First-Response Heat Pump Troubleshooting Checklist
Before calling a professional, a homeowner can take several basic heat pump troubleshooting steps. This requires a few simple tools and a focus on safety.
Safety first. Before touching your heat pump, always turn off the power at both the thermostat and the main circuit breaker. This crucial step prevents electrical shock.
For basic troubleshooting, you'll only need a few items:
- A screwdriver for removing panels.
- New air filters to have on hand for quick replacement.
- A flashlight for inspecting dark areas.
- A level to check if the outdoor unit is sitting evenly, which can affect performance.
- A garden hose for gently cleaning the outdoor unit or melting ice.
These tools are sufficient for handling thermostat adjustments, filter changes, and debris removal. However, any work involving electrical components, refrigerant, or internal mechanical parts should be left to trained technicians.
Knowing your limits is smart. Basic troubleshooting can solve many simple problems, but for complex issues, professional help is the safest and most effective solution.
1. Check Your Thermostat Settings
Many heat pump troubleshooting issues trace back to the thermostat. Before assuming a complex mechanical problem, always check these simple settings first.
Incorrect settings can prevent your system from operating as you intend. The good news is that these are simple to fix.
- Mode Setting: Ensure the thermostat is set to "Heat" for warmth, "Cool" for air conditioning, or "Auto" to let the system decide. If it's on "Off," the system won't run.
- Temperature Setpoint: For heating, the target temperature must be higher than the current indoor temperature. A range of 68°F to 72°F is generally comfortable and energy-efficient.
- Fan Setting: Set the fan to "Auto." The "On" setting runs the fan continuously, even when the system isn't heating or cooling, which can make the air feel cool.
- Batteries: A dim or blank display often means the thermostat needs new batteries. This simple fix can resolve many unresponsiveness issues.
Modern smart thermostats offer greater control and can help you identify potential issues sooner. Learn how smart HVAC systems can help you optimize your heat pump's performance.
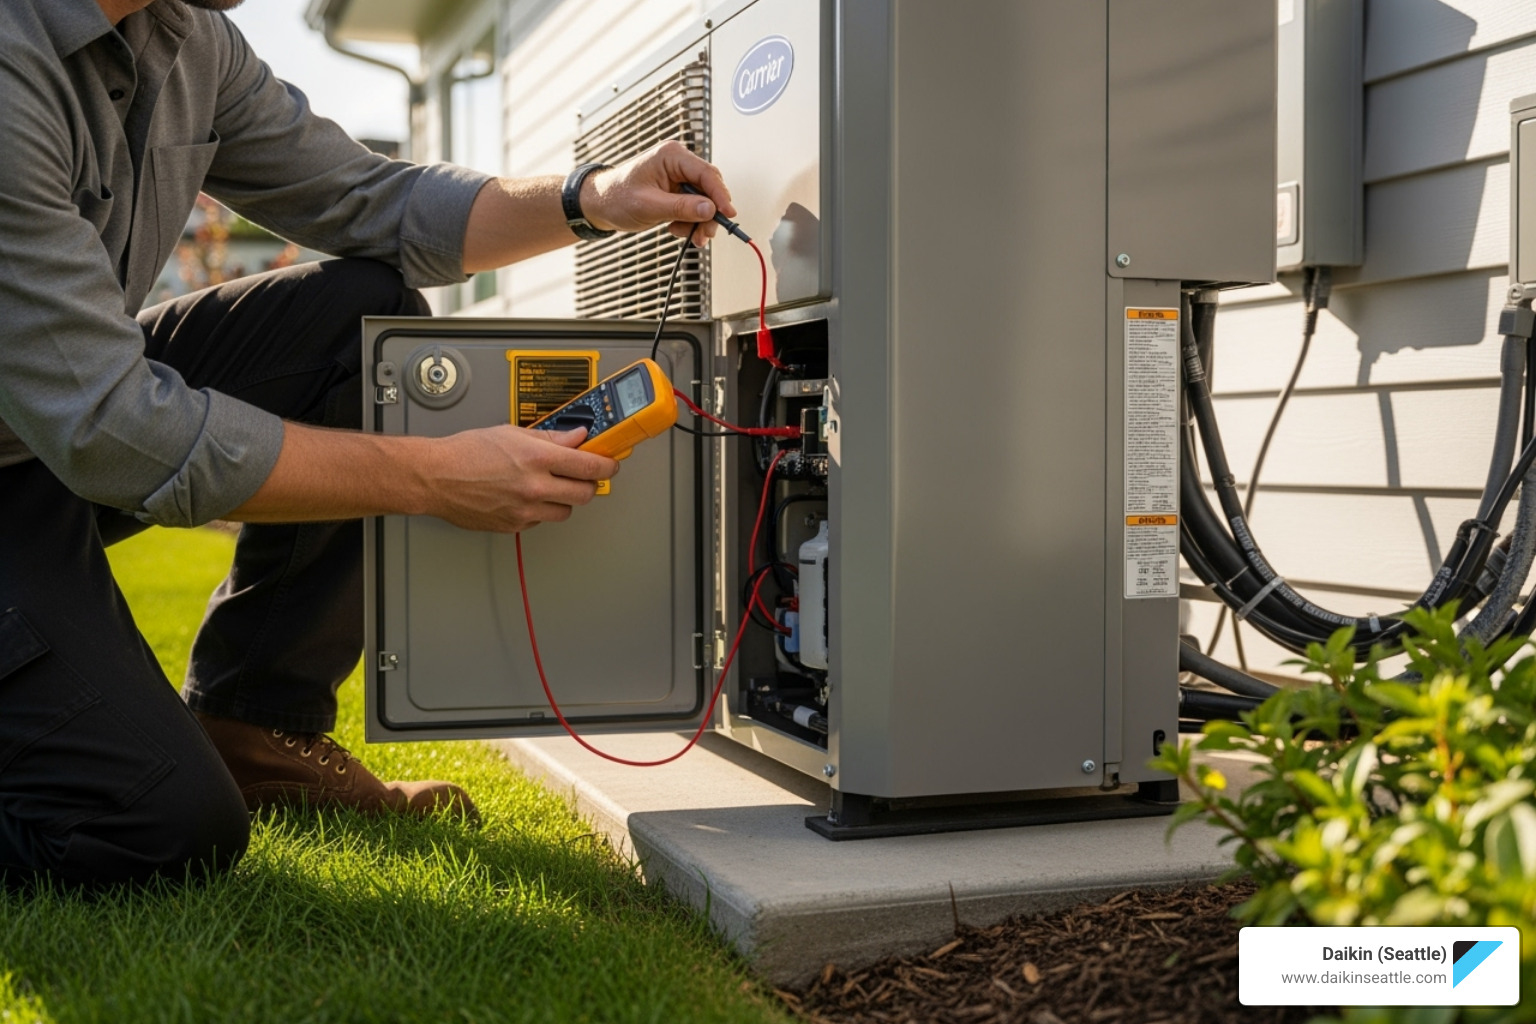
2. Inspect Power and Circuit Breakers
If your heat pump stops working entirely, the cause is often electrical. Heat pump troubleshooting should always include checking the power supply, as this simple step frequently resolves the issue.
- Main Electrical Panel: Your heat pump uses two separate circuit breakers—one for the outdoor unit and one for the indoor air handler. Look for any breakers that are in the "off" or a middle position. To reset a tripped breaker, flip it fully to "off" and then firmly back to "on."
- Repeated Tripping: If a breaker trips again immediately, do not keep resetting it. This indicates a serious electrical problem that requires a professional.
- Outdoor Disconnect Switch: Near your outdoor unit is a disconnect switch in a small box. Ensure this switch is in the "on" position, as it can sometimes be accidentally turned off.
- Indoor Unit Power Switch: The indoor air handler often has a power switch nearby that looks like a standard light switch. Check that it hasn't been flipped off by mistake.
These power checks are quick but can save you an unnecessary service call. If the system still won't turn on, or if breakers keep tripping, it's time to call for professional assistance.
3. Clean or Replace Your Air Filters
A dirty air filter is one of the most common and easily fixed causes of heat pump problems. When clogged with dust, pet hair, and other particles, it restricts the airflow your system needs to operate efficiently.

Your heat pump is designed to move a specific volume of air across its coils. A dirty filter reduces this airflow, forcing the system to work harder, which increases energy bills and puts stress on components.
For heat pump troubleshooting, this restricted airflow is particularly problematic. It can disrupt the heat exchange process and cause the outdoor unit to freeze, even in mild weather.
Fortunately, this is an easy fix. Check your filter monthly by holding it up to a light. If you can't see light through it, it's time for a replacement.
Most homes require a new filter every three to four months. However, if you have pets, allergies, or live in a dusty area, you may need to replace it more often.
Clean air filters are essential not just for your heat pump but also for your family's health. Learn more about the importance of indoor air quality and how it affects your overall well-being.
4. Clear the Outdoor Unit
Your outdoor unit needs clear space to function correctly. Heat pump troubleshooting frequently involves this area, as obstructions are a common source of problems.
The outdoor unit uses a large fan to pull air through its coils. Debris like fallen leaves, grass clippings, and twigs can accumulate around the unit, blocking airflow and forcing the system to work harder.
Snow and ice buildup is a significant issue in winter. Heavy accumulation can block airflow and damage fan blades if the unit attempts to run while obstructed.
We recommend maintaining at least two feet of clear space around all sides of your outdoor unit for proper airflow. Regularly clear away any debris during yard work.
In winter, use a soft broom to gently brush away snow. If ice has formed, melt it with warm (not hot) water. Never use sharp objects or shovels to remove ice, as the delicate aluminum coils are easily damaged and expensive to repair.

This simple maintenance step can prevent frustration and costly repairs, ensuring your unit operates reliably.
When to Call a Professional: Advanced Heat Pump Problems
If you've performed all the basic checks and your heat pump is still malfunctioning, it's time to call a professional. Some issues require specialized tools, training, and safety protocols that go beyond DIY heat pump troubleshooting.
Attempting to fix these complex problems yourself can be dangerous and may cause further damage.
- Electrical Issues: Problems beyond a tripped breaker, such as faulty wiring or burnt-out capacitors, carry high voltage and require a trained technician.
- Refrigerant Leaks: Refrigerant is a hazardous material that must be handled by a certified professional. It's both an environmental and safety concern.
- Compressor Failure: The compressor is the heart of your system. Grinding or buzzing noises often signal a major failure that requires professional diagnosis.
- Faulty Reversing Valve: This internal component switches the system between heating and cooling. If it fails, it requires specialized knowledge of refrigerant systems to replace.
For these complex problems, our team has the expertise to provide reliable solutions. Find expert heat pump solutions in Seattle when DIY troubleshooting isn't enough.
Signs of a Refrigerant Leak
Refrigerant is the substance that allows your heat pump to transfer heat. What are the signs of a refrigerant leak in a heat pump? The clues are often subtle.
- Hissing Sounds: A hissing or bubbling noise from either unit may indicate refrigerant escaping.
- Frozen Evaporator Coils: Low refrigerant pressure can cause the indoor coil to freeze, even with a clean air filter.
- Reduced Performance: The air from your vents may feel lukewarm, and the system may run constantly without reaching the set temperature.
- Oily Residue on Coils: Refrigerant contains oil to lubricate the compressor. Leaks often leave an oily residue around coils or connections.
According to OSHA refrigerant safety information, these chemicals can be hazardous. Never attempt to fix a refrigerant leak yourself; it is illegal without certification and dangerous.
Advanced Heat Pump Troubleshooting for Mechanical Failures
Several mechanical failures can cause significant problems and typically require professional repair.
How does a faulty reversing valve affect a heat pump's operation? It directs refrigerant flow for heating or cooling. When it fails, the system may get stuck in one mode, such as cooling in the winter.
A bad starter capacitor prevents the compressor or fan motor from starting. You might hear a clicking sound, but the component won't turn on. Capacitors store a dangerous electrical charge and should only be handled by professionals.
What troubleshooting steps can be taken if the indoor air handler is not working? Beyond checking power, issues with the blower motor can cause weak airflow or loud noises. A failing motor cannot circulate conditioned air effectively.
What causes a heat pump to make unusual noises? Often, it's the compressor struggling with internal damage. Loud banging or grinding sounds are serious signs of compressor problems, which can lead to complete system failure.
Understanding Multi-Zone System Issues
Multi-zone systems offer customized comfort but add troubleshooting complexity.
- Zone-Specific Problems: If one area isn't heating or cooling correctly while others are fine, the issue is likely isolated to that zone's thermostat, damper, or ductwork.
- Damper Control Issues: Motorized dampers direct airflow. If a damper is stuck, a zone may get no air or too much.
- Thermostat Communication: Each zone thermostat must communicate with a central control panel. A faulty thermostat or wiring can disrupt the entire system.
Understanding how multi-zone HVAC systems work helps you identify whether a problem is system-wide or isolated, which is useful information for a service professional.
Proactive Care: The Key to a Healthy Heat Pump
Proactive care is the best way to ensure your heat pump runs reliably and efficiently. Focusing on prevention makes emergency heat pump troubleshooting far less likely.
How does regular maintenance help prevent heat pump problems? It extends your system's lifespan, improves efficiency, and prevents costly repairs by catching minor issues before they escalate into major breakdowns.
A well-maintained heat pump runs more quietly and efficiently, saving you money on energy bills and avoiding unexpected repair costs. It's a small investment that provides peace of mind and long-term value. Choosing the right HVAC system for your home is the first step; proper maintenance ensures you get the most out of that investment.
The Importance of Regular Professional Tune-Ups
While DIY maintenance is important, it doesn't replace a professional tune-up. A trained technician can spot issues an untrained eye might miss and perform tasks that require specialized tools and knowledge.
Here's how DIY and professional maintenance compare:
| DIY Maintenance Checklist | Professional Maintenance Checklist |
|---|---|
| Check/replace air filters periodically | Clean condenser and evaporator coils |
| Keep outdoor unit clear of debris | Check refrigerant levels and pressures |
| Ensure vents are unobstructed | Inspect and tighten electrical connections |
| Check thermostat batteries | Lubricate moving parts (motors, fans) |
| Listen for unusual noises | Check thermostat calibration |
| Inspect ductwork for leaks | |
| Test defrost cycle and reversing valve | |
| Measure airflow and temperature rise/drop | |
| Inspect safety controls and condensate drain |
Tasks like coil cleaning, checking electrical connections, and verifying refrigerant levels are critical for safety and efficiency but should only be performed by a professional. Lubricating moving parts prevents premature wear and ensures quiet operation. These services add up to significant improvements in performance and reliability.
Maximizing Your System's Efficiency
Beyond maintenance, you can take other steps to help your heat pump work smarter.
- Optimal Thermostat Schedules: Programming your thermostat to set back temperatures when you're away or asleep can cut energy use by 10-15%. Smart thermostats can automate this process.
- Sealing Ductwork Leaks: Leaks in your ductwork can waste 20-30% of your system's output, forcing it to work harder. Sealing them ensures conditioned air reaches your living spaces.
- Home Insulation: Proper insulation in your walls, attic, and crawl spaces, along with sealed windows and doors, reduces heat loss. This means your heat pump runs less, saving energy and reducing wear.
These improvements work together to create a highly efficient system. Learn about the most energy-efficient HVAC systems to see how modern technology can further improve your home's comfort and efficiency.
Conclusion
Mastering basic heat pump troubleshooting empowers you to solve common issues quickly. You can now identify warning signs and handle simple fixes like checking the thermostat, inspecting circuit breakers, replacing air filters, and clearing the outdoor unit.
This guide also helps you recognize when to call in professionals. Refrigerant leaks, electrical faults, and major mechanical failures are not DIY tasks. Knowing your limits is key to protecting your safety and your investment.
Think of this guide as a way to understand what your heat pump is telling you. Whether it's running constantly or blowing cold air, you now have a better idea of the potential causes, from a normal defrost cycle to a stuck reversing valve that needs professional attention.
At Daikin, we believe in empowering homeowners with knowledge while standing ready to help with complex issues. Our commitment to advanced, reliable home comfort solutions means we want you to get the most from your system. Our unique Pacific Northwest Daikin Experience Center in Seattle lets you see these technologies firsthand.
Whether you need maintenance, repairs, or an upgrade, our team understands the challenges of Pacific Northwest weather. For comprehensive and energy-efficient HVAC solutions in Seattle, we're here to help you stay comfortable year-round.
Schedule a Visit

your individual indoor comfort needs
products firsthand
with an authorized Daikin Dealer
.webp)
See why our customers Choose Us

“Jem is very inviting and knowledgeable. She gave us a walk through of the Daikin Experience Center and patiently answered all our questions. Learned a lot about HVAC’s through this visit.”
“Jem did a great job walking us through the various Daikin products and efficiencies of the products. She was very knowledgeable on everything Daikin. Highly recommend coming in for a tour prior to picking out your various AC systems.”
“Great experience at Daikin Seattle Experience Center: pre-purchase demos of home heating system (Daikin Fit), list of HVAC companies, working Daikin staff and external contractors to ensure highest quality. This experience sets the bar of how any home HVAC experience should be. Have got the Daikin Fit installed and so far seems to work very well – quiet, good home heating in peak winter (heat transfer/BTU/air handling); Functionality of Daikin thermostat and the iPhone app makes it very easy to use.”
“This place is awesome! If you are in the market for a new HVAC system, visit the Daikin Experience Center to get educated on the newest technology as well as available rebates and incentives for where you live. They’ll even connect you with local contractors in your area who install Daikin equipment.”
