


What You Need to Know About How the Daikin Indoor and Outdoor Units Are Connected
Understanding how the Daikin indoor and outdoor units are connected comes down to three main links between the two units:
- Refrigerant piping - Two copper pipes (a gas line and a liquid line) carry refrigerant between the units through a small hole in the exterior wall
- Electrical wiring - Power and signal cables run alongside the refrigerant pipes, connecting matched terminals on each unit
- Condensate drainage - A drain hose carries moisture collected by the indoor unit safely away from your home
All three connections are bundled together in a conduit that typically requires only a four-inch hole through your exterior wall — no ductwork needed.
If you're dealing with high utility bills, rooms that never quite reach the right temperature, or air quality that leaves something to be desired, the way your system is physically connected matters more than most people realize. A properly connected Daikin split system isn't just about getting cold or warm air — it's about getting consistent, efficient comfort year-round, which is exactly what Seattle's variable Pacific Northwest climate demands.
Each connection point plays a specific role in system performance, energy efficiency, and long-term reliability. When any one of these three links is installed incorrectly, you can end up with refrigerant leaks, electrical faults, or water damage — all of which are avoidable with the right installation approach.
Learn more about how the daikin indoor and outdoor units are connected:
Understanding the Components of a Daikin Split System
To understand how these systems link together, it helps to first look at the individual components that make up a Daikin split or multi-split system. Unlike traditional ducted heating and cooling systems that rely on a massive network of metal ducts hidden in your attic or crawlspace, a Daikin ductless system places the heating and cooling power exactly where you need it.
The system is split into two primary locations:
- The Indoor Unit: This is the sleek, quiet unit mounted inside your living space (on a wall, floor, or recessed in the ceiling). It houses the evaporator coil, a quiet fan, an air filter, and advanced sensors that monitor room temperature.
- The Outdoor Unit: This is the heavy-duty condenser unit placed outside your home. It contains the condenser coil, a fan, and the "heart" of the system—the inverter compressor.
Daikin's advanced inverter compressor is a game-changer for energy efficiency. Rather than turning completely on and off like a traditional single-stage system (which wastes a massive amount of electricity), the inverter compressor modulates its speed continuously. It adjusts its output precisely based on the heating or cooling load of your home. To understand why this is so revolutionary, check out our guide on Daikin Inverter vs Traditional HVAC Technology.
Additionally, modern Daikin systems lead the industry in sustainability by utilizing R-32 refrigerant. R-32 is a next-generation refrigerant that carries heat more efficiently than older refrigerants like R410A. It reduces the system's global warming potential (GWP) by up to 75% and can boost overall electricity savings by up to 10%.
To help visualize how these configurations differ, here is a quick breakdown of single-split versus multi-split setups:
| Feature | Single-Split System | Multi-Split System |
|---|---|---|
| Indoor Units | Exactly 1 indoor unit | Up to 5 indoor units |
| Outdoor Units | 1 outdoor unit | 1 outdoor unit |
| Temperature Control | Single zone control | Individual zone control per room |
| Best Suited For | Single rooms, additions, open-plan spaces | Whole-home heating & cooling, multi-story layouts |
| Piping Complexity | Low (one direct line set) | Moderate (multiple line sets routed to one outdoor unit) |
Single-Split vs. Multi-Split Configurations
When planning your system layout in the Pacific Northwest, you will choose between a single-split (single-zone) or a multi-split (multi-zone) configuration.
A single-split system connects one indoor unit to one dedicated outdoor unit. This is an incredibly popular option for targeted comfort, such as heating a newly remodeled attic, a home office, or a stubborn basement that always feels damp and cold. If you are looking to treat just one area, the Daikin Single Zone Ductless System Benefits are hard to beat, offering simple installation and dedicated climate control.
A multi-split system, such as Daikin's MXM multi-zone systems, connects up to five indoor units to a single, robust outdoor unit. This setup is perfect for whole-home comfort. Each indoor unit operates independently, allowing you to set the master bedroom to a cool 68°F while keeping the living room at a cozy 72°F.
By eliminating the energy losses associated with leaky ductwork, these multi-zone systems can achieve incredible efficiency ratings of up to 21 SEER2 and 10 HSPF2. This means lower utility bills for Washington homeowners, even during the dampest winter stretches or our increasingly warm summer weeks.
How the Daikin Indoor and Outdoor Units Are Connected in 3 Steps
Now that we know what the components are, let's look at the physical installation. The beauty of a Daikin ductless system lies in how minimally invasive the connection process is. Instead of tearing open drywall to install bulky sheet-metal ducts, our professional installers only need to create a small, four-inch opening in your home's exterior wall.
Through this single, sealed opening, we run a bundled conduit containing the refrigerant lines, the electrical communication cables, and the condensate drain line.
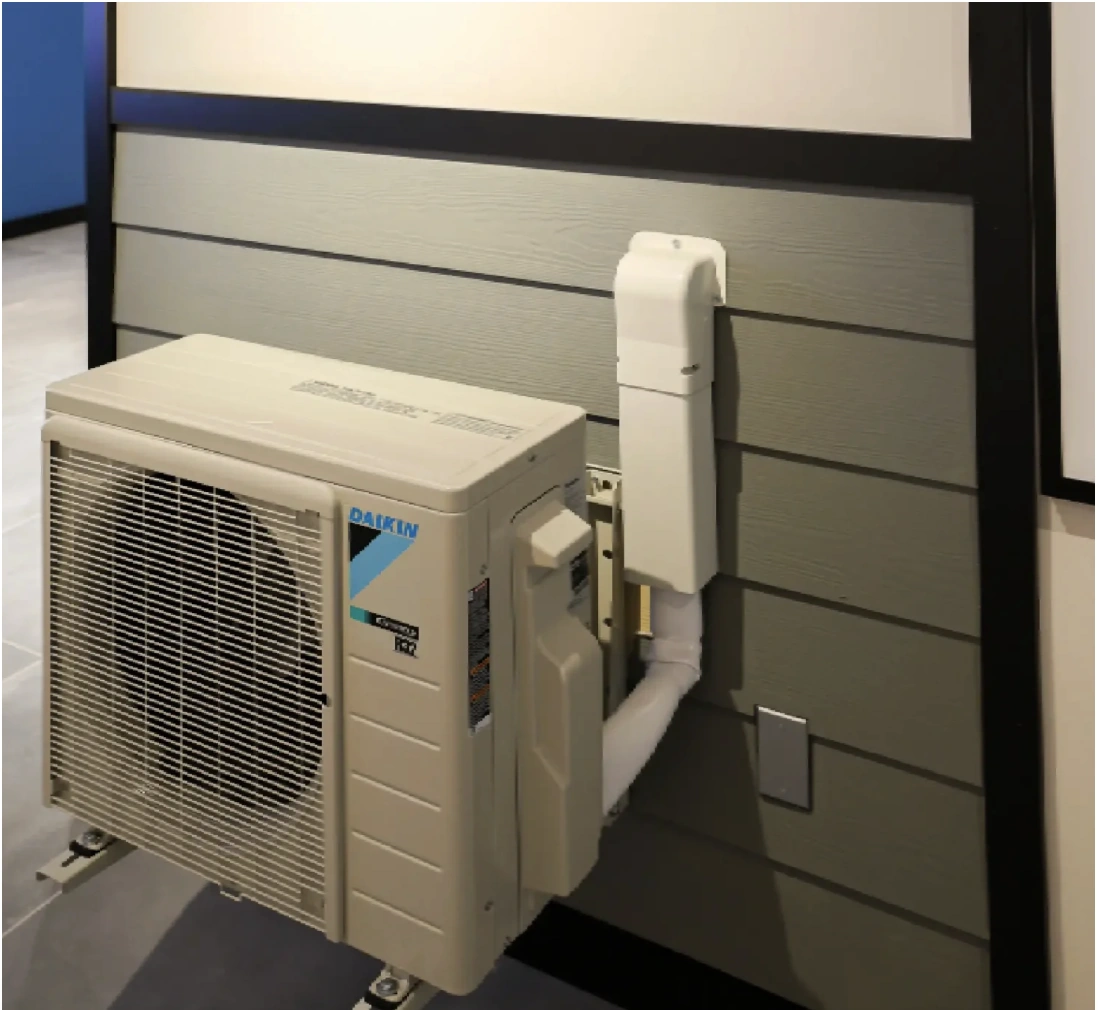
This clean, compact bundle connects the indoor comfort zone directly to the outdoor condenser. For a complete walkthrough of what installation day looks like, read our detailed guide on Daikin Ductless Installation What to Expect.
Let's break down the connection process into three clear steps.
Step 1: How the Daikin Indoor and Outdoor Units Are Connected via Refrigerant Piping
Refrigerant is the thermal medium that moves heat into or out of your home. To allow this refrigerant to flow, we run two high-grade copper pipes between the indoor and outdoor units:
- The Liquid Line: A narrower copper pipe (typically 6.35mm or 1/4" in diameter) that carries liquid refrigerant.
- The Gas Line: A wider copper pipe (typically 9.52mm or 12.7mm depending on the unit size) that carries gaseous refrigerant.
Because these pipes carry extreme temperatures, they must be insulated individually with high-quality foam insulation to prevent energy loss and eliminate condensation from dripping inside your walls. You can read more about this routing process in our article How Daikin Line Sets Are Run Through Your Walls.
Connecting these copper lines requires incredible precision. Installers use a specialized flaring tool to cut and flare the ends of the copper pipes at perfect right angles, ensuring there are no burrs or imperfections. These flared ends are then aligned with the service valves on the units and tightened using a calibrated torque wrench.
Using exact torque values (such as 18 Nm for 1/4" pipes or 42 Nm for 3/8" pipes) is critical. Over-tightening can crack the flare nut, while under-tightening will lead to a slow refrigerant leak over time.
Daikin also enforces strict limits on pipe lengths to protect the system's compressor:
- Minimum Pipe Length: Must be at least 1.5 meters (about 5 feet). This prevents refrigerant noise and compressor vibrations from transferring into your quiet indoor living space.
- Maximum Pipe Length: Ranges from 20 meters (for smaller 25/35 models) up to 30 meters (for larger 50/60 models).
- Additional Refrigerant: Daikin systems come pre-charged from the factory for up to 10 meters of piping. If the installation requires a longer run, additional refrigerant must be added at a precise rate of 20 grams per meter to maintain optimal operating pressures.
Step 2: How the Daikin Indoor and Outdoor Units Are Connected via Electrical Wiring
Once the physical refrigerant pathway is established, we must connect the electrical "nervous system" that allows the indoor and outdoor units to power up and communicate.
Daikin systems typically utilize a four-wire connection that runs between the terminal blocks of the indoor and outdoor units. This inter-unit wiring serves a dual purpose: it delivers electrical power to the indoor unit's fan and sensors, and it facilitates continuous, two-way data communication.
During installation, matching the terminal numbers between the indoor and outdoor units is absolutely critical. Terminal 1 on the indoor unit must connect to Terminal 1 on the outdoor unit, Terminal 2 to Terminal 2, and so on. A single crossed wire can prevent the system from communicating, trigger error codes, or potentially damage the sensitive printed circuit boards (PCBs).
This continuous communication loop is what allows Daikin's inverter technology to shine. The indoor unit constantly monitors the room's temperature and sends real-time data back to the outdoor compressor. The compressor then instantly adjusts its speed to match the heating or cooling demand. To learn more about how this digital communication translates to superior comfort, explore How Daikin Inverter Systems Outperform Single Stage Equipment.
For safety, the entire electrical connection is routed through a dedicated outdoor electrical disconnect switch (or safety switch) mounted near the outdoor unit, allowing technicians to safely cut power during routine maintenance.
Step 3: Managing Condensate Drainage Between the Units
When your Daikin system is running in cooling mode (or dehumidifying mode), the cold evaporator coil inside the indoor unit pulls moisture out of your home's air. This moisture condenses into water droplets, which collect in a built-in drain pan at the bottom of the indoor unit.
To prevent water from dripping down your interior walls, we connect a dedicated condensate drain hose to the indoor unit's drain pan. This hose is routed through the same four-inch wall hole alongside the refrigerant and electrical lines.
There are two primary ways to manage this water runoff:
- Gravity Drainage: Whenever possible, we install the drain line with a continuous downward slope. Gravity naturally pulls the water down the tube and deposits it safely outside your home, away from your foundation.
- Condensate Pump: If the indoor unit is mounted on an interior wall or in a basement where a downward gravity path is impossible, we install a small, quiet condensate pump. This pump actively pushes the collected water up and out to an appropriate drainage point.
Ensuring this line remains clear and correctly sloped is vital for preventing water damage. For tips on keeping your drain lines clear, check out our guide on How to Prevent Daikin Ductless Water Leaks from Clogged Drain Lines.
Key Installation Guidelines and Safety Best Practices
Installing a Daikin split system is not a standard DIY project. Because it involves high-voltage electrical wiring, pressurized refrigerant lines, and precise calibration, it requires specialized tools and technical expertise.
When a professional team handles your installation, they follow strict manufacturer guidelines to ensure your system runs at peak efficiency for decades:
- Nitrogen Purging: While joining copper pipes, nitrogen gas is run through the lines to prevent oxidation and soot buildup inside the pipes, which could otherwise clog the compressor.
- Pressure Testing: Once connected, the lines are pressurized with nitrogen to check for even the microscopic leaks that could allow refrigerant to escape.
- Vacuum Pumping: A vacuum pump is connected to pull the system down to a deep vacuum (typically below 500 microns). This process removes all air and moisture from the lines. If moisture is left inside, it can mix with the system's oil and create a destructive acid that ruins the compressor.
- Proper Clearances: The outdoor unit must be mounted securely on a level concrete pad or wall bracket with plenty of clearance around it to ensure unrestricted airflow.
To ensure your system is set up for maximum performance and qualifies for Daikin's outstanding warranty protections, always work with local experts. Read more about our professional standards in How a Certified Daikin Dealer Installs Your Ductless System.
Frequently Asked Questions About Daikin Connections
What is the maximum distance allowed between the indoor and outdoor units?
The maximum allowable piping length depends on the specific Daikin model you choose. For smaller residential units (like the 25 and 35 models), the maximum piping length is 20 meters (about 65 feet). For larger capacity systems (such as the 50 and 60 models), the piping can run up to 30 meters (about 98 feet).
That there are also elevation limits (typically around 15 meters) representing the maximum vertical height difference between the indoor and outdoor units. If your pipe run exceeds 10 meters, your installer will need to add additional refrigerant charge (20g/m) during commissioning.
Why is there a minimum pipe length of 1.5 meters?
A minimum pipe length of 1.5 meters (about 5 feet) is required to act as a physical buffer between the units. The outdoor unit contains a powerful compressor and fan that naturally create vibration and refrigerant flow noise. If the copper pipes are too short, these vibrations and sounds can travel directly along the copper lines and echo inside your quiet home. Keeping the line set at or above 1.5 meters keeps your indoor environment whisper-quiet.
How often do the connection lines require maintenance?
We highly recommend having your Daikin system's connection lines inspected at least once a year as part of a routine seasonal tune-up.
During these inspections, a technician will check the exterior foam insulation for UV damage or pest wear, ensure the electrical connections remain tight, verify that the condensate drain line is flowing freely, and perform a leak check on the refrigerant joints. To keep your system running smoothly through the damp winters and dry summers of Washington, take a look at our Daikin Ductless Maintenance Tips for Pacific Northwest Homes.
Conclusion
Now that you know how the Daikin indoor and outdoor units are connected, you can see why these systems are highly regarded for their efficiency, flexibility, and reliability. By utilizing a simple, non-invasive three-step connection—refrigerant lines, electrical wiring, and a condensate drain—Daikin ductless systems deliver premium comfort without the headaches, drafts, and energy losses of traditional ducted systems.
Whether you are looking to heat a single cold room in Renton or want to design a multi-zone comfort system for your entire home in Tukwila, we are here to help. At Daikin Seattle, we specialize in tailoring these advanced HVAC solutions to the unique climate of the Pacific Northwest.
If you want to experience this technology before making a decision, we invite you to visit our unique Pacific Northwest Daikin Experience Center in Seattle. Here, you can interact with working models, see exactly how the units connect, and find the perfect configuration for your home.
Ready to take the next step toward energy-efficient, customized comfort? Read our Daikin Ductless Solutions Guide Renton WA for local tips, or Schedule your professional ductless installation with Daikin Seattle today to get started!